이 글은 혼자공부하는 자바스크립트(저자 : 윤인성)의 책 내용과 유튜브 동영상을 참고하여 개인적으로 정리하는 글임을 알립니다.
문서 객체 조작
DOMContentLoaded
DOMContentLoaded는 웹 페이지의 모든 HTML 요소가 브라우저에 의해 로드되고 파싱되었을 때 발생하는 이벤트이다.
이는 이미지, 스타일시트 등의 외부 자원을 기다리지 않고, HTML 요소들 자체가 다 로드되었을 때 발생한다.
이벤트가 발생하면 JavaScript에서 이를 감지하여 특정 기능을 실행하거나 초기화 작업을 할 수 있다.
페이지의 모든 구성 요소가 준비된 상태에서 JavaScript 코드를 실행할 수 있는 타이밍을 제공하여, 더 나은 사용자 경험을 만들거나 웹 애플리케이션을 초기화하는 데 활용할 수 있다.
<!DOCTYPE html>
<html lang="ko">
<head>
  <title>transition-timing-function</title>
  <script>
    document.addEventListener('DOMContentLoaded', function() {
      // DOMContentLoaded 이벤트가 발생했을 때 실행할 코드
      console.log('DOM이 완전히 로드되었습니다!');

      document.body.innerHTML = '<h1>새로운 제목</h1><p>새로운 문단</p>'
    });
  </script>
</head>
<body>
  <!-- 바디 태그에선 실질적으로 입력한 것이 없음. -->
</body>
</html>
문서 객체 가져오기
document.body를 사용하면 문서와 body 요소를 읽어들일 수 있다.
이외에도 HTML 문서에 있는 요소와 title 요소 등은 아래와 같은 방법으로 읽어 들일 수 있다.
- document.body
- document.head
- document.title
document.querySelector
body 요소 내부에 만든 다른 요소들은 아래와 같은 다른 별도의 메소드를 사용해서 접근한다.
document.querySelector는 CSS 선택자를 사용하여 문서에서 요소를 선택하는 JavaScript의 메서드이다.
이를 통해 문서 내에서 원하는 요소를 선택하고 조작할 수 있다.
// 클래스가 'example'인 첫 번째 <div> 요소 선택
const element = document.querySelector('div.example');

// id가 'myElement'인 요소 선택
const specificElement = document.querySelector('#myElement');

// <button> 태그 중 첫 번째 요소 선택
const button = document.querySelector('button');

// 속성 선택자를 사용하여 선택
const attributeElement = document.querySelector('[data-id="123"]');
<!DOCTYPE html>
<html>
<head>
  <title>querySelector 예시</title>
</head>
<body>
  <h1 id="mainHeading">안녕하세요, 여기는 제목입니다!</h1>
  <h1 id="mainHeading">안녕하세요, 여기는 제목입니다!</h1>

  <script>
    // h1 태그 선택
    const heading = document.querySelector('#mainHeading');

    // 내용 변경
    heading.textContent = '환영합니다!';

    // 스타일 변경
    heading.style.color = 'blue';
    heading.style.fontSize = '28px';
  </script>
</body>
</html>
document.querySelectorAll
document.querySelectorAll는 지정된 CSS 선택자에 해당하는 모든 요소를 찾아 NodeList라는 정적인 유사 배열(Collection)로 반환하는 JavaScript의 메서드이다.
// 클래스가 'example'인 모든 <div> 요소들을 선택하여 NodeList로 반환
const elements = document.querySelectorAll('div.example');

// 클래스가 'highlight'인 모든 요소들을 선택하여 NodeList로 반환
const highlightedElements = document.querySelectorAll('.highlight');

// <p> 태그 중 모든 요소들을 선택하여 NodeList로 반환
const paragraphs = document.querySelectorAll('p');querySelectorAll은 일치하는 모든 요소를 선택하고 NodeList로 반환하기 때문에 forEach나 다른 반복문을 사용하여 NodeList의 각 요소에 접근하고 조작할 수 있다.
// 선택된 모든 <p> 요소의 텍스트 내용을 변경
const paragraphs = document.querySelectorAll('p');
paragraphs.forEach(paragraph => {
  paragraph.textContent = '새로운 내용';
});
<!DOCTYPE html>
<html>
<head>
  <title>querySelectorAll 예시</title>
</head>
<body>
  <h1>첫 번째 제목</h1>
  <h1>두 번째 제목</h1>
  <h1>세 번째 제목</h1>

  <script>
    // 모든 h1 태그 선택
    const headings = document.querySelectorAll('h1');

    // 각 h1 태그의 내용 변경
    headings.forEach((heading, index) => {
      heading.textContent = `새로운 제목 ${index + 1}`;
      heading.style.color = 'green';
    });
  </script>
</body>
</html>
글자 조작
innerHTML과 textContent는 JavaScript에서 DOM 요소의 내용을 조작하는 데 사용되는 두 가지 속성이다.
보통 텍스트만 변경해야 하는 경우에는 textContent를 사용하고, HTML을 조작해야 하는 경우에는 innerHTML을 사용한다.
그러나 innerHTML을 사용할 때는 새 HTML을 파싱하고 해당 요소의 내용을 완전히 대체하기 때문에, 기존에 연결된 이벤트 핸들러 등이 손실될 수 있다.
// 요소의 HTML 내용을 변경
element.innerHTML = '<p>새로운 HTML</p>';
// 요소의 텍스트 내용을 변경
element.textContent = '새로운 텍스트';
<!DOCTYPE html>
<html>
<head>
  <title>innerHTML vs textContent</title>
</head>
<body>
  <div id="exampleInnerHTML">innerHTML 예시</div>
  <div id="exampleTextContent">textContent 예시</div>

  <script>
    const innerHTMLExample = document.getElementById('exampleInnerHTML');
    innerHTMLExample.innerHTML = '새로운 innerHTML 예시';

    const textContentExample = document.getElementById('exampleTextContent');
    textContentExample.textContent = '새로운 textContent 예시';
  </script>
</body>
</html>
속성 조작
getAttribute와 setAttribute는 JavaScript에서 요소의 속성(attribute)을 가져오거나 설정하는 메서드이다.
getAttribute: 지정된 요소의 속성 값을 반환합니다. 이를 사용하여 요소의 속성 값을 가져올 수 있다.
// id 속성의 값을 가져옴
const elementId = element.getAttribute('id');

// href 속성의 값을 가져옴
const linkHref = linkElement.getAttribute('href');
setAttribute: 지정된 요소에 속성을 설정하거나 새로운 속성을 추가다.
첫 번째 인자로는 설정하려는 속성의 이름을, 두 번째 인자로는 속성의 값을 전달한다.
// id 속성을 설정
element.setAttribute('id', 'newIdValue');

// href 속성을 설정
linkElement.setAttribute('href', 'https://www.example.com');
스타일 조작
style 속성은 JavaScript에서 DOM 요소의 인라인 스타일을 직접 조작할 때 사용된다.
이 속성은 해당 요소의 스타일을 동적으로 변경하는 데 유용하다.
CSS와 JavaScript에서 사용되는 스타일 속성 이름은 대부분 유사하지만 몇 가지 주의해야 할 점이 있다.
하이픈(-)을 사용하는 속성 이름: CSS에서 하이픈을 사용하여 표기하는 몇 가지 속성 이름은 JavaScript에서 직접 속성 이름으로 사용할 수 없다. JavaScript에서는 카멜 케이스(camelCase)로 변환하여 사용해야 한다.
- CSS: font-size
- JavaScript: fontSize
또는 아래와 같이 스타일을 조작할 수 있다.
h1.style['background-color']
<!DOCTYPE html>
<html>
<head>
  <title>h1 태그 스타일 조작</title>
</head>
<body>
  <h1 id="mainHeading">안녕하세요, 여기는 제목입니다!</h1>

  <button onclick="changeHeadingStyle()">제목 스타일 변경</button>

  <script>
    function changeHeadingStyle() {
      const heading = document.getElementById('mainHeading');

      // h1 태그의 스타일 변경
      heading.style.color = 'blue';
      heading.style.fontSize = '32px';
      heading.style.fontFamily = 'Arial, sans-serif';
      heading.style.textAlign = 'center';
    }
  </script>
</body>
</html>
문서 객체 생성
이벤트 리스너와 이벤트 핸들러는 JavaScript에서 이벤트를 관리하고 처리하는 데 사용되는 용어이다.
- 이벤트 리스너 (Event Listener): 이벤트 리스너는 특정 이벤트(클릭, 마우스 오버, 키 누름 등)가 발생했을 때 그것을 감지하고, 이에 대응하여 특정한 동작을 수행하는 함수이다.
- 이벤트 핸들러 (Event Handler): 이벤트 핸들러는 이벤트가 발생했을 때 실행되는 함수를 가리킨다. 이벤트 핸들러는 이벤트 리스너에 등록되어 특정 이벤트가 발생했을 때 실행된다. 이벤트 핸들러는 주로 콜백 함수 형태로 사용된다.
// 버튼 요소 선택
const button = document.getElementById('myButton');

// 이벤트 핸들러 함수
function clickHandler() {
  alert('버튼이 클릭되었습니다!');
}

// 이벤트 리스너 추가
button.addEventListener('click', clickHandler);
문서 객체를 생성하고 싶을 때는 document.createElement()를 이용한다.
document.createElement() 메서드는 새로운 HTML 요소를 생성하는 JavaScript의 기능이다.
이 메서드를 사용하면 스크립트로 새로운 HTML 요소를 동적으로 생성할 수 있다.
// 새로운 button 요소 생성
const newButton = document.createElement('button');

// 버튼에 텍스트 추가
newButton.textContent = '클릭하세요!';

// 버튼에 이벤트 리스너 추가
newButton.addEventListener('click', function() {
  alert('버튼이 클릭되었습니다!');
});

// 버튼을 body에 추가
document.body.appendChild(newButton);
appendChild
appendChild는 JavaScript에서 DOM 요소에 자식 요소를 추가하는 메서드이다.
이 메서드를 사용하면 새로운 요소를 기존 요소의 자식으로 추가할 수 있다.
예를 들어, 새로운 <p> 요소를 생성하고 이를 <div> 요소의 자식으로 추가하는 코드는 다음과 같다.
// 새로운 <p> 요소 생성 const newParagraph = document.createElement('p'); newParagraph.textContent = '새로운 문장'; // <div> 요소 선택 const targetDiv = document.getElementById('targetDiv'); // <div> 요소에 새로운 <p> 요소를 자식으로 추가 targetDiv.appendChild(newParagraph);
getElementById()
Document 객체의 메서드로, HTML 문서 내에서 특정 ID를 가진 요소를 가져올 때 사용된다.
이 메서드는 해당 ID를 가진 요소를 반환한다.
문서 객체 제거
일반적으로 요소를 제거하려면 해당 요소의 부모 요소로부터 제거하는 방식을 사용한다.
parentElement.removeChild(childElement);또는
// 부모 요소 직접 참조하여 제거
const elementToRemove = document.getElementById('toBeRemoved');
elementToRemove.parentNode.removeChild(elementToRemove);
이벤트 설정
// 버튼 요소 선택
const button = document.getElementById('myButton');

// 버튼에 클릭 이벤트 리스너 추가
button.addEventListener('click', function() {
  // 이벤트 발생 시 실행할 코드
  alert('버튼이 클릭되었습니다!');
});addEventListener는 이벤트 유형(예: 'click', 'mouseover' 등)과 그에 따라 실행될 함수(이벤트 핸들러)를 지정하여 요소에 이벤트를 추가할 수 있다.
이를 통해 사용자의 상호작용에 반응하여 원하는 동작을 수행할 수 있다.
이벤트 제거
button.removeEventListener(이벤트 이름, 핸들러 함수);const button = document.getElementById('myButton');
function clickHandler() {
alert('버튼이 클릭되었습니다!');
}
// 클릭 이벤트 리스너 추가
button.addEventListener('click', clickHandler);
// 클릭 이벤트 리스너 제거
button.removeEventListener('click', clickHandler);
이벤트 활용
키보드 이벤트
키보드 이벤트는 아래와 같이 3가지가 있다.
//keydown 이벤트
document.addEventListener('keydown', function(event) {
  console.log('Key pressed:', event.key);
});

//keyup 이벤트
document.addEventListener('keyup', function(event) {
  console.log('Key released:', event.key);
});

//keypress 이벤트
document.addEventListener('keypress', function(event) {
  console.log('Key pressed (keypress):', event.key);
});
keypress 이벤트는 아시아권 문자를 제대로 처리하지 못하는 오류가 있어서 보통 keyup 이벤트를 사용한다.
<!DOCTYPE html>
<html>
  <head>
    <title></title>
    <script>
      document.addEventListener('DOMContentLoaded', () => {
        const textarea = document.querySelector('textarea')
        const h1 = document.querySelector('h1')

        textarea.addEventListener('keyup', (event) => {
          const length = textarea.value.length
          h1.textContent = `글자 수: ${length}`
        })
      })
    </script>
  </head>
  <body>
    <h1></h1>
    <textarea></textarea>
  </body>
</html>
textarea 등과 같은 텍스트를 입력하는 양식의 값은 value 속성으로 읽어드릴 수 있다.
키보드 키코드 사용
키 코드를 이용하여 이벤트 핸들러에서 특정 키를 감지하고 처리할 수 있다.
하지만 주의해야 할 점이 있다.
keyCode는 Deprecated되었고, 대신에 key나 code 속성을 사용하는 것이 권장된다.
key는 키의 실제 값(예: 'a', 'Enter', 'Shift' 등)을 나타내고, code는 키보드의 물리적인 위치를 나타내는 값이다.
document.addEventListener('keydown', function(event) {
  // Using key property
  console.log('Key pressed (using key):', event.key);

  // Using code property
  console.log('Key pressed (using code):', event.code);

  // Example: Check if the 'Enter' key is pressed
  if (event.key === 'Enter' || event.code === 'Enter') {
    console.log('Enter key pressed');
  }
});
이벤트 발생 객체
이벤트를 발생시킨 객체에 접근하기 위해서는 두 가지 방법이 있다.
- event.currentTarget
- this
event.currentTarget를 통해 접근
<!DOCTYPE html>
<html>
<head>
  <title>h1 태그 스타일 조작</title>
  <script>
    document.addEventListener('DOMContentLoaded', () => {
      const textarea = document.querySelector('textarea');
      const h1 = document.querySelector('h1');

      const listener = (event) => {
        const length = event.currentTarget.value.length;
        h1.textContent = `글자 수 ${length}`;
      };

      textarea.addEventListener('keyup', listener);
    });
  </script>
</head>
<body>
  <h1></h1>
  <textarea></textarea>
</body>
</html>

this를 통해 접근
<!DOCTYPE html>
<html>
<head>
  <title>h1 태그 스타일 조작</title>
  <script>
    document.addEventListener('DOMContentLoaded', function() {
      const textarea = document.querySelector('textarea');
      const h1 = document.querySelector('h1');

      const listener = function() {
        const length = this.value.length;
        h1.textContent = `글자 수 ${length}`;
      };

      textarea.addEventListener('keyup', listener);
    });
  </script>
</head>
<body>
  <h1></h1>
  <textarea></textarea>
</body>
</html>
글자 입력 양식 이벤트
inch를 cm 단위로 변환하는 예제
<!DOCTYPE html>
<html>
  <head>
    <title></title>
    <script>
      document.addEventListener('DOMContentLoaded', () => {
        const input = document.querySelector('input')
        const button = document.querySelector('button')
        const p = document.querySelector('p')

        button.addEventListener('click', () => {
          // 입력을 숫자로 변환합니다.
          const inch = Number(input.value)
          // 숫자가 아니라면 바로 리턴합니다.
          if (isNaN(inch)) {
            p.textContent = '숫자를 입력해주세요'
            return
          }
          // 변환해서 출력합니다.
          const cm = inch * 2.54
          p.textContent = `${cm} cm`
        })
      })
    </script>
  </head>
  <body>
    <input type="text"> inch<br>
    <button>계산</button>
    <p></p>
  </body>
</html>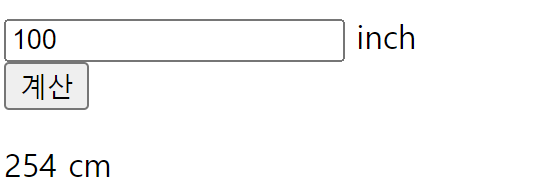
이메일 형식 확인 예제
<!DOCTYPE html>
<html>
  <head>
    <title></title>
    <script>
      document.addEventListener('DOMContentLoaded', () => {
        const input = document.querySelector('input')
        const p = document.querySelector('p')
        const isEmail = (value) => {
          // 골뱅이를 갖고 있고 && 골뱅이 뒤에 점이 있다면
          return (value.indexOf('@') > 1)
            && (value.split('@')[1].indexOf('.') > 1)
        }

        input.addEventListener('keyup', (event) => {
          const value = event.currentTarget.value
          if (isEmail(value)) {
            p.style.color = 'green'
            p.textContent = `이메일 형식입니다: ${value}`
          } else {
            p.style.color = 'red'
            p.textContent = `이메일 형식이 아닙니다: ${value}`
          }
        })
      })
    </script>
  </head>
  <body>
    <input type="text">
    <p></p>
  </body>
</html>
change 이벤트
이 코드에서 keyup 대신 change를 사용할 수 있다.input.addEventListener('keyup', (event) => {
change 이벤트는 사용자가 입력 폼 요소 (주로 <input>, <select>, <textarea>)에서 내용을 변경하고 포커스를 잃었을 때 발생하는 이벤트이다.
이 이벤트는 사용자가 값을 변경하고 입력을 완료하거나 해당 요소를 떠날 때 한 번만 발생한다.
드롭다운 목록 활용
기본 select 태그 예제
<!DOCTYPE html>
<html>
  <head>
    <title></title>
    <script>
      document.addEventListener('DOMContentLoaded', () => {
        const select = document.querySelector('select')
        const p = document.querySelector('p')

        select.addEventListener('change', (event) => {
          const options = event.currentTarget.options
          const index = event.currentTarget.options.selectedIndex

          p.textContent = `선택: ${options[index].textContent}`
        })
      })
    </script>
  </head>
  <body>
    <select>
      <option>떡볶이</option>
      <option>순대</option>
      <option>오뎅</option>
      <option>튀김</option>
    </select>
    <p>선택: 떡볶이</p>
  </body>
</html>
mutiple select 태그
<!DOCTYPE html>
<html>
  <head>
    <title></title>
    <script>
      document.addEventListener('DOMContentLoaded', () => {
        const select = document.querySelector('select')
        const p = document.querySelector('p')

        select.addEventListener('change', (event) => {
          const options = event.currentTarget.options
          const list = []
          for (const option of options) {
            if (option.selected) {
              list.push(option.textContent)
            }
          }
          p.textContent = `선택: ${list.join(',')}`
        })
      })
    </script>
  </head>
  <body>
    <select multiple>
      <option>떡볶이</option>
      <option>순대</option>
      <option>오뎅</option>
      <option>튀김</option>
    </select>
    <p></p>
  </body>
</html>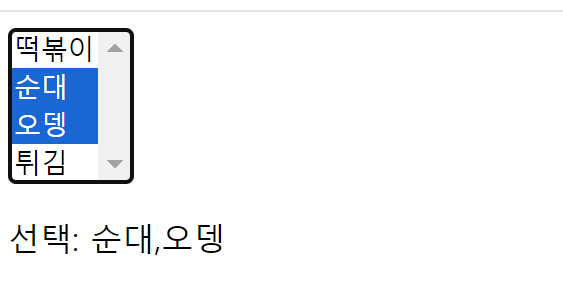
cm 단위를 여러 단위로 변환하는 예제
<!DOCTYPE html>
<html>
  <head>
    <title></title>
    <script>
      document.addEventListener('DOMContentLoaded', () => {
        let 현재값
        let 변환상수 = 10

        const select = document.querySelector('select')
        const input = document.querySelector('input')
        const span = document.querySelector('span')

        const calculate = () => {
          span.textContent = (현재값 * 변환상수).toFixed(2)
        }

        select.addEventListener('change', (event) => {
          const options = event.currentTarget.options
          const index = event.currentTarget.options.selectedIndex
          변환상수 = Number(options[index].value)
          calculate()
        })

        input.addEventListener('keyup', (event) => {
          현재값 = Number(event.currentTarget.value)
          calculate()
        })
      })
    </script>
  </head>
  <body>
    <input type="text"> cm =
    <span></span>
    <select>
      <option value="10">mm</option>
      <option value="0.01">m</option>
      <option value="0.393701">inch</option>
    </select>
  </body>
</html>
체크박스 활용 예제
<!DOCTYPE html>
<html>
  <head>
    <title></title>
    <script>
      document.addEventListener('DOMContentLoaded', () => {
        let [timer, timerId] = [0, 0]
        const h1 = document.querySelector('h1')
        const checkbox = document.querySelector('input')

        checkbox.addEventListener('change', (event) => {
          if (event.currentTarget.checked) {
            // 체크 상태
            timerId = setInterval(() => {
              timer += 1
              h1.textContent = `${timer}초`
            }, 1000)
          } else {
            // 체크 해제 상태
            clearInterval(timerId)
          }
        })
      })
    </script>
  </head>
  <body>
    <input type="checkbox">
    <span>타이머 활성화</span>
    <h1></h1>
  </body>
</html>
라디오 버튼 활용 예제
<!DOCTYPE html>
<html>
  <head>
    <title></title>
    <script>
      document.addEventListener('DOMContentLoaded', () => {
        // 문서 객체 추출하기
        const output = document.querySelector('#output')
        const radios = document.querySelectorAll('[name=pet]')

        // 모든 라디오 버튼에
        radios.forEach((radio) => {
          // 이벤트 연결
          radio.addEventListener('change', (event) => {
            const current = event.currentTarget
            if (current.checked) {
              output.textContent = `좋아하는 애완동물은 ${current.value}이시군요!`
            }
          })
        })
      })
    </script>
  </head>
  <body>
    <h3># 좋아하는 애완동물을 선택해주세요</h3>
    <input type="radio" name="pet" value="강아지">
    <span>강아지</span>
    <input type="radio" name="pet" value="고양이">
    <span>고양이</span>
    <input type="radio" name="pet" value="햄스터">
    <span>햄스터</span>
    <input type="radio" name="pet" value="기타">
    <span>기타</span>
    <hr>
    <h3 id="output"></h3>
  </body>
</html>
기본 이벤트 막기
웹 브라우저는 마우스 오른쪽 버튼을 클릭하면 컨텍스트 메뉴를 출력한다.
이처럼 어떤 이벤트가 발생했을 때 웹 브라우저가 기본적으로 처리해주는 것을 기본 이벤트라고 부른다.
기본 이벤트를 제거할 때는 event 객체의 preventDefalut() 메소드를 사용한다.
<!DOCTYPE html>
<html>
  <head>
    <title></title>
    <script>
      document.addEventListener('DOMContentLoaded', () => {
        const imgs = document.querySelectorAll('img')

        imgs.forEach((img) => {
          img.addEventListener('contextmenu', (event) => {
            event.preventDefault()
          })
        })
      })
    </script>
  </head>
  <body>
    <img src="http://placekitten.com/300/300" alt="">
  </body>
</html>
위 코드를 실행하면 고양이 사진이 뜨는데 해당 사진위에서 마우스 우클릭을 하면 컨텍스트 메뉴가 뜨지 않는다.
체크할 때만 링크 활성화 예제
<!DOCTYPE html>
<html>
  <head>
    <title></title>
    <script>
      document.addEventListener('DOMContentLoaded', () => {
        let status = false

        const checkbox = document.querySelector('input')
        checkbox.addEventListener('change', (event) => {
          status = event.currentTarget.checked
        })

        const link = document.querySelector('a')
        link.addEventListener('click', (event) => {
          if (!status) {
            event.preventDefault()
          }
        })
      })
    </script>
  </head>
  <body>
    <input type="checkbox">
    <span>링크 활성화</span>
    <br>
    <a href="http://hanbit.co.kr">한빛미디어</a>
  </body>
</html>
할일 목록 만들기
<!DOCTYPE html>
<html>
  <head>
    <title></title>
  </head>
  <body>
    <h1>할 일 목록</h1>
    <input id="todo">
    <button id="add-button">추가하기</button>
    <div id="todo-list">


    </div>
  </body>
  <script>
    document.addEventListener('DOMContentLoaded', () => {
      // 문서 객체를 가져옵니다.
      const input = document.querySelector('#todo')
      const todoList = document.querySelector('#todo-list')
      const addButton = document.querySelector('#add-button')

      // 변수를 선언합니다.
      let keyCount = 0

      // 함수를 선언합니다.
      const addTodo = () => {
        // 입력 양식에 내용이 없으면 추가하지 않습니다.
        if (input.value.trim() === '') {
          alert('할 일을 입력해주세요.')
          return
        }

        // 문서 객체를 설정합니다.
        const item = document.createElement('div')
        const checkbox = document.createElement('input')
        const text = document.createElement('span')
        const button = document.createElement('button')

        // 문서 객체를 식별할 키를 생성합니다.
        const key = keyCount
        keyCount += 1

        // item 객체를 조작하고 추가합니다.
        item.setAttribute('data-key', key)
        item.appendChild(checkbox)
        item.appendChild(text)
        item.appendChild(button)
        todoList.appendChild(item)

        // checkbox 객체를 조작합니다.
        checkbox.type = 'checkbox'
        checkbox.addEventListener('change', (event) => {
          item.style.textDecoration
            = event.target.checked ? 'line-through' : ''
        })

        // text 객체를 조작합니다.
        text.textContent = input.value

        // button 객체를 조작합니다.
        button.textContent = '제거하기'
        button.addEventListener('click', () => {
          removeTodo(key)
        })

        // 입력 양식의 내용을 비웁니다.
        input.value = ''
      }

      const removeTodo = (key) => {
        // 식별 키로 문서 객체를 제거합니다.
        const item = document.querySelector(`[data-key="${key}"]`)
        todoList.removeChild(item)
      }

      // 이벤트 연결
      addButton.addEventListener('click', addTodo)
      input.addEventListener('keyup', (event) => {
        // 입력 양식에서 Enter 키를 누르면 바로 addTodo() 함수를 호출합니다.
        const ENTER = 13
        if (event.keyCode === ENTER) {
          addTodo()
        }
      })
    })
  </script>
</html>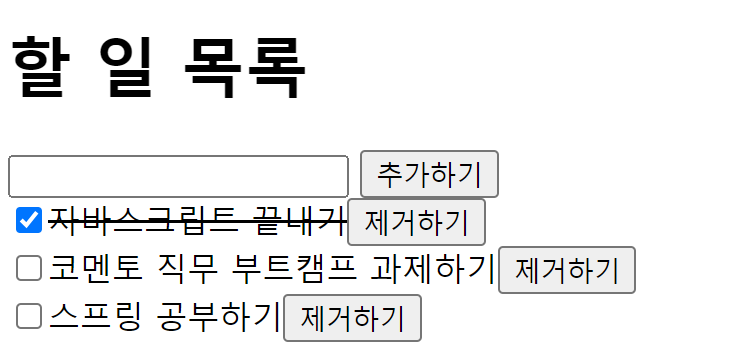
localStorage 객체
localStorage 객체는 웹 브라우저의 클라이언트 측에 데이터를 저장하는 데 사용되는 웹 스토리지 객체 중 하나이다. localStorage는 키-값 쌍으로 데이터를 저장하고, 이 데이터는 도메인과 프로토콜에 국한되어 해당 도메인에서만 접근할 수 있다.
저장된 데이터는 사용자의 로컬 브라우저에 영구적으로 보존되며, 동일한 도메인의 모든 페이지에서 공유된다.
- window 객체의 속성을 통해 localStorage에 접근할 수 있다.
window.localStorage
- setItem(key, value): 지정된 키와 값을 사용하여 데이터를 저장한다. 만약 이미 같은 키가 존재하면 기존 값은 덮어쓴다.
localStorage.setItem('username', 'JohnDoe');
- getItem(key): 지정된 키에 대한 값을 반환한다. 만약 해당 키가 없으면 null을 반환한다.
const username = localStorage.getItem('username');
- removeItem(key): 지정된 키와 관련된 데이터를 삭제한다.
localStorage.removeItem('username');
- clear(): 모든 데이터를 삭제하여 localStorage를 초기화한다.
localStorage.clear();
- key(index): 지정된 인덱스에 해당하는 키를 반한한다. localStorage에 저장된 키의 순서는 추가된 순서를 따른다.
const firstKey = localStorage.key(0);
<!DOCTYPE html>
<html>
  <head>
    <title></title>
    <script>
      document.addEventListener('DOMContentLoaded', () => {
        const p = document.querySelector('p')
        const input = document.querySelector('input')
        const button = document.querySelector('button')

        const savedValue = localStorage.getItem('input')
        // localStorage.input도 가능합니다.
        if (savedValue) {
          input.value = savedValue
          p.textContent = `이전 실행 때의 마지막 값: ${savedValue}`
        }

        input.addEventListener('keyup', (event) => {
          const value = event.currentTarget.value
          localStorage.setItem('input', value)
          // localStorage.input = value도 가능합니다.
        })

        button.addEventListener('click', (event) => {
          localStorage.clear()
          input.value = ''
        })
      })
    </script>
  </head>
  <body>
    <p></p>
    <button>지우기</button>
    <input type="text">
  </body>
</html>
JSON 이용
Storage 타입은 문자열 데이터만 저장한다.
JSON.stringify()와 JSON.parse()는 각각 JavaScript 객체를 JSON 문자열로 변환하거나, JSON 문자열을 JavaScript 객체로 변환하는 메소드이다.
- JSON.stringify() : 이 메소드는 JavaScript 객체를 JSON 문자열로 변환한다.
const myObject = { key1: 'value1', key2: 'value2' };
const jsonString = JSON.stringify(myObject);
console.log(jsonString); // '{"key1":"value1","key2":"value2"}'
- JSON.parse() : 이 메소드는 JSON 문자열을 JavaScript 객체로 변환한다.
const jsonString = '{"key1":"value1","key2":"value2"}';
const myObject = JSON.parse(jsonString);
console.log(myObject); // { key1: 'value1', key2: 'value2' }
storage에서 객체 저장하고 꺼내기
let testObject = { 'one': 1, 'two': 2, 'three': 3 };

//JSON 객체 저장
localStorage.setItem('testObject', JSON.stringify(testObject));

//JSON 객체 불러오기
let retrievedObject = localStorage.getItem('testObject');

console.log('retrievedObject: ', JSON.parse(retrievedObject));
'JavaScript Category > JavaScript' 카테고리의 다른 글
| [JavaScript] 클래스 (0) | 2024.01.18 |
|---|---|
| [JavaScript] 예외처리 (0) | 2024.01.18 |
| [JavaScript] 객체(Object) (0) | 2024.01.16 |
| [JavaScript] 함수 (1) | 2024.01.15 |
| [JavaScript] 반복문 (0) | 2024.01.14 |

댓글